JobbyM's Blog

了解 Webpack 原理

子曰:万里之行,始于足下。

本文是根据掘金上的这篇文章 做了一夜动画,让大家十分钟搞懂Webpack 实现的

一、什么是 Webpack

webpack 是一个打包工具,他的宗旨是一切静态资源皆可打包。

二、原理分析

首先我们通过制作一个打包文件的原型来了解原理。
假设有两个 js 模块,这里我们先假设这两个模块是符合 commomjs 标准的 es5 模块。
语法和模块化规范转换的事我们先放一放,后面说。
我们的目的是将这两个模块打包为一个能在浏览器端运行的文件,这个文件其实叫 bundle.js。
比如

1
2
3
// index.js
var add = require('add.js').default
console.log(add(1, 2))
1
exports.default = function (a, b) { return a + b}

在浏览器中直接执行这个程序肯定会有问题 最主要的问题是浏览器中没有 exports 对象与 require 方法所以一定会报错。

我们需要通过模拟 exports 对象和 require 方法,来解决这个问题

1.模拟 exports 对象

首先我们知道如果在 nodejs 打包的时候我们会使用 fs.readfileSync() 来读取 js 文件。这样的话 js 文件会是一个字符串。而如果需要将字符串中的代码运行会有两个方法分别是 new Function 与 eval。

在这里我们选用执行效率较高的 eval。

1
2
3
var exports = {}
eval('exports.default = function(a,b) {return a + b}') // node文件读取后的代码字符串
exports.default(1, 3)

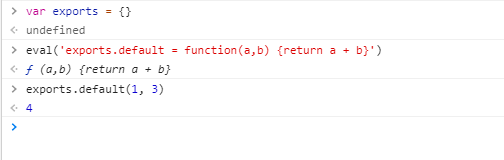
上面这段代码的运行结果可以将模块中的方法绑定到 exports 对象中。用于子模块中会生命变量,为了不污染全局,我们使用一个自执行匿名函数(IIFE)来封装一下。

1
2
3
4
5
6
var exports = {}
;(function(exports, code){
eval(code)

console.log(exports.default(1, 3))
})(exports, 'exports.default = function(a,b) {return a + b}')

2.模拟 require 方法

require 函数的功能比较简单,就是根据提供的 file 名称加载对应的模块。

首先我们看看如果只有一个固定模块应该怎么写。

1
2
3
4
5
6
7
8
9
function require(file) {
var exports = {}
;(function (exports, code) {
eval(code)
})(exports, 'exports.default = function(a,b) {return a + b}')
return exports
}
var add = require('add.js').default
console.log(add(1, 2))

完成了固定模块,我们下面只需要稍加改动,将所有模块的文件名和字符串整理为一张 key-value 表就可以根据传入的文件名加载不同的模块了。

1
2
3
4
5
6
7
8
9
10
11
12
13
14
;(function (list) {
function require(file) {
var exports = {}
; (function (exports, code) {
eval(code)
})(exports, list[file])
return exports
}
require('index.js')
})({
'index.js': `var add = require('add.js').default
console.log(add(1, 2))`,
'add.js': `exports.default = function (a, b) { return a + b}`
})

当然要说明的一点是真正 webpack 生成的 bundle.js 文件中还需要增加模块间的依赖关系。

叫做依赖图(Dependency Graph)

类似下面的情况。

1
2
3
4
5
6
7
8
9
10
{
"./src/index.js": {
"deps": { "./add.js": "./src/add.js"},
"code": ""
},
"./src/add.js": {
"deps": {},
"code": ""
}
}

另外,由于大多数前端程序都习惯使用 es6 语法所以还需要预先将 es6 语法转换为 es5 语法。

总结一下思路,webpack 打包可以分为以下三个步骤:

  1. 分析依赖
  2. ES6 转 ES5
  3. 替换 exports 和 require

下面进入功能实现阶段

三、功能实现

我们的目标是将以下两个互相依赖的 ES6Module 打包为一个可以在浏览器中运行的一个 JS 文件(bundle.js)

  • 处理模块化
  • 多模块合并打包 - 优化网络请求
1
2
// src/add.js
export default (a, b) => a + b
1
2
3
// src/index.js
import add from './add.js'
console.log(add(1, 2))

1.分析模块

模块的分析相当于对读取的文件代码字符串进行解析。这一步其实和高级语言的编译过程一致。需要将模块解析为抽象语法树 AST。我们借助 @babel/parser 来完成。

AST (Abstract Syntax Tree)抽象语法树 在计算机科学中,或简称语法树(Syntax tree),是源代码语法结构的一种抽象表示。它以树状的形式表现编程语言的语法结构,树上的每个节点都表示源代码中的一种结构。(astexplorer.net/

分析模块分为以下三个步骤:

  • 读取文件
  • 收集依赖
  • 编译与 AST 解析
1
2
3
4
npm i @babel/parser
npm i @babel/traverse
npm i @babel/core
npm i @babel/preset-env
1
2
3
4
5
6
7
8
9
10
11
12
13
14
15
16
17
18
19
20
21
22
23
24
25
26
27
28
29
30
31
32
33
34
35
36
37
38
39
// webpack.js
const fs = require('fs')
const path = require('path')
const parser = require('@babel/parser')
const traverse = require('@babel/traverse').default
const babel = require('@babel/core')

function getModuleInfo(file) {
// 读取文件
const body = fs.readFileSync(file, 'utf-8')

// 转换 AST 语法树
const ast = parser.parse(body, {
sourceType: "module", // 表示我们要解析的是 ES 模块
})

// 依赖收集
const deps = {}

traverse(ast, {
ImportDeclaration({ node }) {
const dirname = path.dirname(file)
const abspath = "./" + path.join(dirname, node.source.value)
deps[node.source.value] = abspath
}
})

// ES6 转成 ES5
const { code } = babel.transformFromAst(ast, null, {
presets: ["@babel/preset-env"]
})

const moduleInfo = { file, deps, code }
return moduleInfo

}

const info = getModuleInfo('./src/index.js')
console.log('info:', info)

2.收集依赖

上一步开发的函数可以单独解析某一个模块,这一步我们需要开发一个函数从入口模块开始根据依赖关系进行递归解析。最后将依赖关系构成为依赖图(Dependency Graph)

1
2
3
4
5
6
7
8
9
10
11
12
13
14
15
16
17
18
19
20
21
22
23
24
25
26
27
28
29
30
31
32
33
// wepback.js
/**
* 模块解析
* @param {*} file
*/
function parseModules(file) {
const entry = getModuleInfo(file)
const temp = [entry]
const depsGrap = {}

getDeps(temp, entry)

temp.forEach(moduleInfo => {
depsGrap[moduleInfo.file] = {
deps: moduleInfo.deps,
code: moduleInfo.code
}
})

return depsGrap
}
/**
* 获取依赖
* @param {*} temp
* @param {*} param1
*/
function getDeps(temp, { deps }) {
Object.keys(deps).forEach(key => {
const child = getModuleInfo(deps[key])
temp.push(child)
getDeps(temp, child)
})
}

3.生成 bundle 文件

这一步我们需要将刚才的执行函数和依赖图合起来输出到最后的打包文件。

1
2
3
4
5
6
7
8
9
10
11
12
13
14
15
16
17
18
19
20
21
22
// webpack.js
function bundle(file) {
const depsGraph = JSON.stringify(parseModules(file))
return `(function (graph) {
function require(file) {
function absRequire(relPath) {
return require(graph[file].deps[relPath])
}
var exports = {}
;(function (require, exports, code) {
eval(code)
})(absRequire, exports, graph[file].code)
return exports
}
require('${file}')
})(${depsGraph})`
}

const content = bundle('./src/index.js')

!fs.existsSync('./dist') && fs.mkdirSync('./dist')
fs.writeFileSync('./dist/bundle.js', content)

最后可以编写一个简单的测试程序测试一下结果。

1
<script src="./dist/bundle.js"></script>